Notes on getting LEDE/OpenWRT to work on the Netgear WNR2000V1 router
The State of the Union regarding custom firmwares for home routers: Custom firmwares are no strangers to home networking enthusiasts. They offer several advantages compared to stock firmwares in many cases: Security, stabilizability, performance, and features – all long after manufacturers abandon the routers. Last but not least, custom firmwares standardize different brands of routers. Once you have your favorite firmware flashed, you don't have to deal with specific vendor-related settings, jargons, proprietary implementations and quirks.
Among the most popular are DD-WRT, Tomato/USB and its variants, lastly, OpenWRT and its variants (they have a new fork called LEDE, but more to that later). DD-WRT might be the most popular choice among those.
For the most part DD-WRT works acceptably, but DD-WRT comes with limitations. I have been more than once frustrated by the inconsistency of DD-WRT: sometimes only a specific build works, sometimes you have to hunt for a specific version. Additionally, DD-WRT has no good, clear changelog, you have to dig through pages of discussion in the forums to get something working, and the list of problems go on. What it entails is you flash once and forget about it and never update your router. This is, for the most part, acceptable for a router, but is certainly annoying.
Tomato has good user-interface, but is severely limited by the amount of development, hardware and features it supports.
Why OpenWRT/LEDE?
OpenWRT, unlike everyone else, didn't strive to be simple initially. It was a fully-featured distro on a router, so it has everything imaginable, and it runs on practically everything. It might have been a good thing, I don't know – but when I tried out years ago, it was clunky and unintuitive. As time goes by, I have to say that initial impression of mine is no longer valid. LuCi has evolved over the years to be much more mature and clear. Extra packages and functions are described well enough in the OpenWRT wiki. Lately, some developers have switched to a new branch called LEDE, with the hope of better control on the code. Either OpenWRT or LEDE are excellent choices when it comes to third-party firmwares, and I will use the terms interchangeably.
Among my favorite features about the project is stability. Not only are releases bug-free, you can check out the latest trunk build of any router model at any time and be relatively confident that it works stably. I also like new advancements and algorithms being investigated and added every day by project contributors, such as CoDel - anti-buffer bloat. What is buffer bloat? I have here is an excellent explanation for layman people, like me: Bufferbloat - A plumber's view. In my case, those clever algorithms helped me a lot on my free, slow 5Mbps connection that is shared between roommates.
WRN2000v1
Last weekend, my friend Andrew asked me to look at his router – an old WRN2000v1 – he scrapped from another friend. He intended to be a range extender but the stock firmware doesn't support it. He couldn't find a DD-WRT build and was wondering if I could take a look. I, naturally, immediately suggest him to check out LEDE/OpenWRT. However, it is apparent that is is a hard case – it has an abandoned build of OpenWRT Backfire 10.03 on it with the 6 year old interface I hated. It is a relatively obscure router that no one cared about, especially now when it is 8 year old. I doubt even when it came out, it was that well supported by OpenWRT. So I decided to take on the challenge of getting something decent on it.
First, I thought it was possible to load the firmware on it with a regular firmware upgrade and it turned out that I was wrong. Even the script to enable the back-door telnet root shell on the router, telnetenable mentioned in the device's OpenWRT wiki didn't work. So naturally I had to go home and get my good ole USB-to-TTL adapter – one of the indispensable tools in my firmware tinkering toolbox.
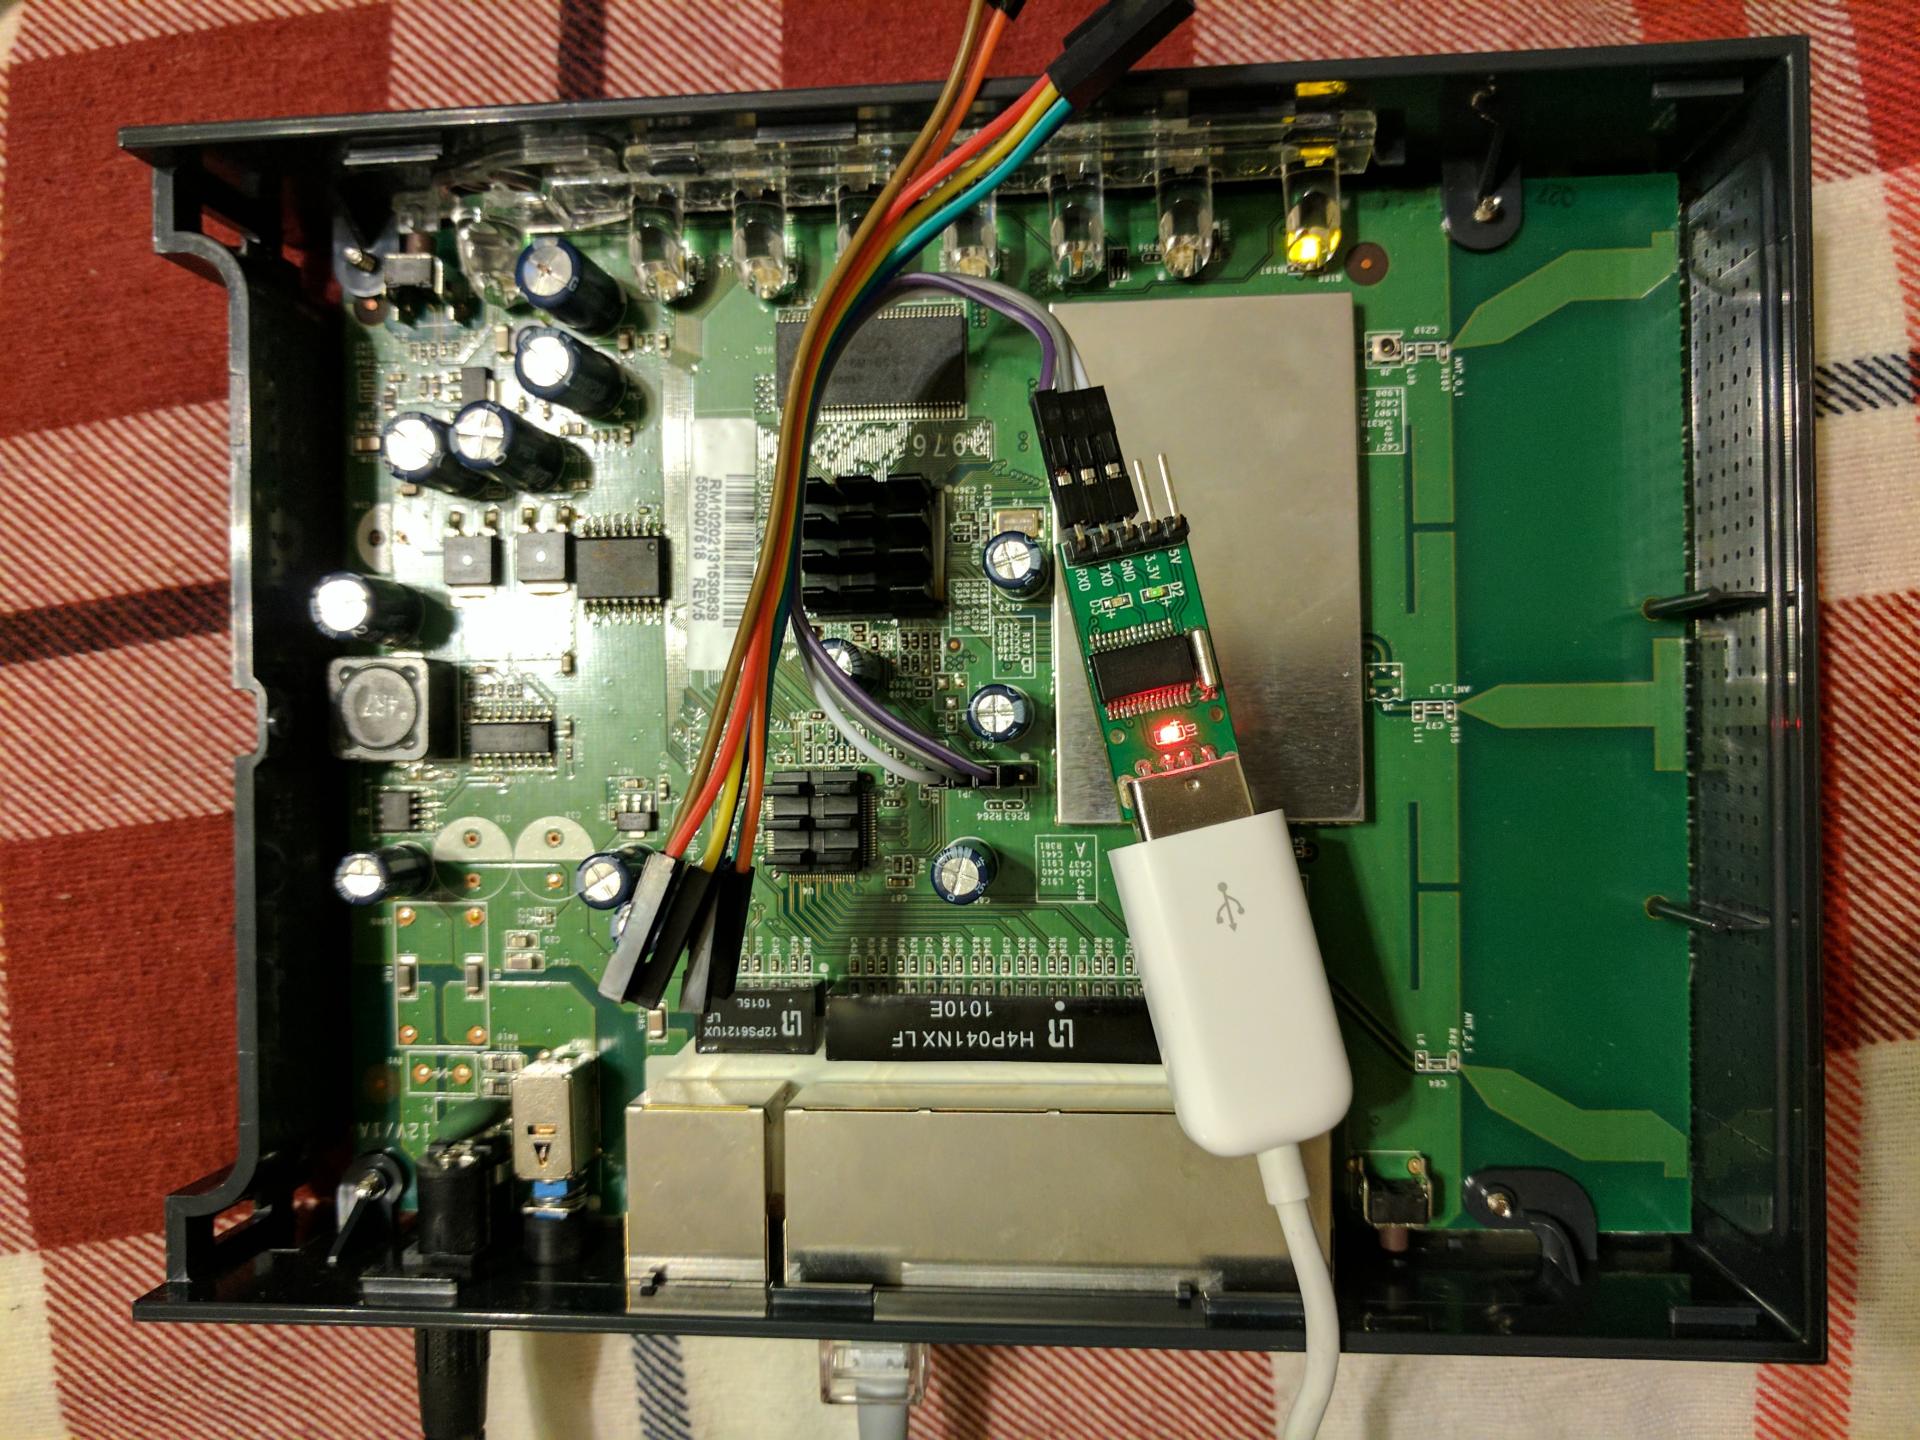
After a couple of seconds looking around I was able to hook the TTL wires to the serial console of the router and was greeted with the root shell. Everything seemed well and couldn't be easier - I was able to get Backfire on the router shortly after following the directions on the wiki. I thought it was going to be smooth sailing, but it turned out that it was just the beginning.
So with a normal, supported OpenWRT device, it is often the case that once the user could get the initial firmware going for it, upgrading to newer versions is done easily by the upgrade firmware interface in the control panel. It turns out that it is not the case here, as the upgrade script on Backfire doesn't know how to exactly deal with the upgrade files so it rejected everything, even on the command line. Moreover, there isn't a build for the device. So I tried to figure out how to upgrade the firmware manually.
MTD explained
After looking around on Backfire busybox shell, I learned the small flash memory (called the mtd - Memory Technology Device) is divided into several smaller partitions named mtd*. There are two things that I flashed at the beginning to get Backfire to work: mtd2 which contains the rootfs (root file system, literally where you mount /) and mtd4 which contains the uImage (sort of the kernel and init scripts). So, my first reaction was to just write new images directly to the partitions by issuing the mtd write command of sorts. Somehow writing new uImages always returned an error, and when I gave up and restarted the router, nothing could bring it to boot.
It turned out that writing past the boundaries of a partition will result in corrupting the next partition in the flash and will require a reinstallation of the whole firmware. After some more tinkering with uboot, the bootloader, I figure as long as I don't corrupt uboot, it is always possible to revert to the stock firmware by repartitioning and then, re-uploading the original firmware via TFTP, and then flashing Backfire by running the install-repart.sh script as pointed out by the wiki.
But then, it was apparent that the small 4MB flash chip was part of the problem. It really doesn't help that the flash chip is divided into a whole bunch of partitions. Here is what the partition map looks like on stock firmware:
{
	.name		= "u-boot",
	.offset		= 0,
	.size		= 0x040000,
	.mask_flags	= MTD_WRITEABLE,
}, {
	.name		= "u-boot-env",
	.offset		= 0x040000,
	.size		= 0x010000,
}, {
	.name		= "rootfs",
	.offset		= 0x050000,
	.size		= 0x240000,
}, {
	.name		= "user-config",
	.offset		= 0x290000,
	.size		= 0x010000,
}, {
	.name		= "uImage",
	.offset		= 0x2a0000,
	.size		= 0x120000,
}, {
	.name		= "language_table",
	.offset		= 0x3c0000,
	.size		= 0x020000,
}, {
	.name		= "rootfs_checksum",
	.offset		= 0x3e0000,
	.size		= 0x010000,
}, {
	.name		= "art",
	.offset		= 0x3f0000,
	.size		= 0x010000,
	.mask_flags	= MTD_WRITEABLE,
}
So… size is the problem ;-). We only have 1179648 bytes for the uImage and 2359296 bytes for rootfs. Given the latest trunk of LEDE (before 12/12/2016) has a 1354098 bytes uImage and 1966080 bytes rootfs, this is not a good news. So we can either:
- Find an old build that has a small uImage and rootfs
- Find a way to shrink the images
- Repartition the mtd so that the images fit
Choice (1) seems the most straight forward – but no, I tried, and wasted a couple of more hours to it. Choice (2) is almost impossible, unless we really, really want to apply a whole bunch of patches and such to LEDE. So it leaves us with choice number (3).
The boot process of WNR2000v1
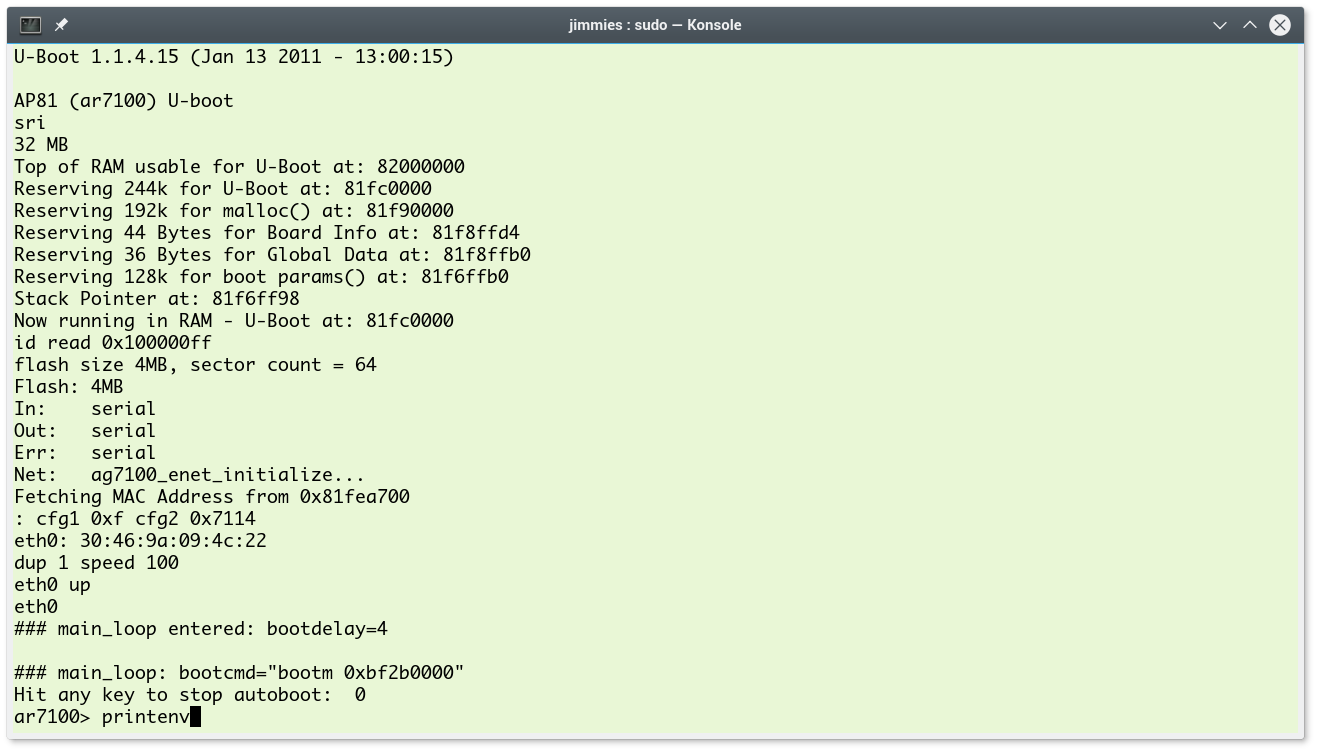
We can indeed repartition the mtd device. I learned as I worked with the WNR2000v1 is that, unlike PCs, embedded devices don't really have exactly the idea of dynamic partitions in the MBR like PCs – ain't nobody got space for that. So you have to tell the kernel where every partition begins and ends. So how do you do it? Either it is hard-coded to the kernel like in the stock firmware, or in the LEDE case, via the bootloader. In this case, the bootloader is u-boot, an open-source bootloader. It is a chunk of code running literally at the very beginning of the mtd devie (u-boot partition starts at 0x0), and every of its settings is written flat on another partition (called u-boot-env, and it starts at offset 0x040000 which is hard-coded into u-boot code). Via the settings, it can keep track of various things, for example, what parameters it should give to the kernel. After doing all that, it surrenders control over to the kernel. In the case that the kernel is corrupted, u-boot also takes care of loading code over TFTP and flashing code to the mtd. Here is what it looks like booting up:
On embedded devices, such as the WNR2000, flash devices have memory-mapped addresses. The first byte of the mtd (offset 0x000000) is mapped to 0xbf000000 on the CPU. Thus, we can write whatever we want to the flash device, but we don't want to write anything before offset 0x050000 because 0x00000 to 0x050000 is where our lifeline, u-boot, is. I learned, we want to preserve ART partition too (ART stores our device-specific information such as serial numbers, MAC addresses). So as long as our code and data fits in the offset 0x050000-0x3f0000, everything should be okay.
Some other tidbits, so u-boot has a hard-coded "magic" value it would look to check to make sure that the code it is about to execute is indeed the kernel image, and that varies between one device and another (in the case of our board, it is 0x32303031 – Edit: later I learned that this version of the router does not check for the magic constant). The compressed uImage has a kernel that starts at pre-arranged entry point 0x80060000.
The kernel figures out where all the partitions are by what is told by u-boot, then proceeds to mount them. It would also mount a squashfs partition that has some reserved space for an "overlay" which is a partition on top of the real partition to retain settings for the routers.
Building LEDE
So first step is to look at the code to see what can be done, selecting the right SoC (AR71XX in this case), and then build the kernel/uImage and rootfs for the device. I want to preserve space so I went ahead and built LEDE from source, it took about 3 hours or less on my laptop. The build script would go fetch, compile the cross compile toolkit and then proceeds to compile the kernel, ipgk packages and then put everything together. I would say given how complex the project is, the build system works perfectly the first time I tried it by following instructions, that is super impressive.
If you need a pre-built image for this router that has the web interface LuCi built-in, head here. Edit on 12/14/2016: As WRN2000v1 support is mainlined, you can download stock uImage and rootfs images on LEDE daily build website, but it won't have LuCi built-in. You'll need two files: ar71xx-generic-wnr2000-rootfs-squashfs.bin (rename it to sqfs.bin), and ar71xx-generic-uImage-lzma.bin (rename it to uImage.bin).
So as we can see, the uImage won't fit into the old partitions, so we will need to expand it a bit. Luckily, as explained, the LEDE kernel won't have a problem adjusting to the new partition scheme. Given we have already flashed the modified u-boot as explained in the OpenWRT wiki, we can go ahead and flash the uImage and rootfs image by setting up a TFTP server with the two files, and do the following while in the u-boot bootloader:
# Tell u-boot that we have a tftp server on 192.168.1.10
setenv serverip 192.168.1.10

# Tell u-boot that the router should take the address 192.168.1.1
setenv ipaddr 192.168.1.1

# Erase the region from 0x050000-0x3f0000
erase 0xbf050000 +0x3A0000

# Load sqfs.bin on TFTP server, and put it to memory address 0x81000000
tftpboot 0x81000000 sqfs.bin
# U-boot will tell you the length of sqfs.bin in hex, let's say ZZZZZZ
# Copy bit by bit 0xZZZZZZ bytes from offset 0x050000
cp.b 0x81000000 0xbf050000 0xZZZZZZ

# Same to the uImage.bin, write it right next to sqfs.bin
# Again, 0xYYYYYY is the length that tftpboot reports
tftpboot 0x81000000 uImage.bin
cp.b 0x81000000 0xbf2b0000 0xYYYYYY

# We need to tell the kernel what board it is booting into, and where to find the partitions
setenv bootargs "board=WNR2000 console=ttyS0,115200 mtdparts=spi0.0:256k(u-boot)ro,64k(u-boot-env)ro,3712k(firmware),64k(art)ro rootfstype=squashfs,jffs2 noinitrd"

# Tell u-boot where to find the uImage
setenv bootcmd "bootm 0xbf2b0000"

# Tell u-boot to save parameters to the u-boot-env partitions
saveenv

# Reset the board
reset
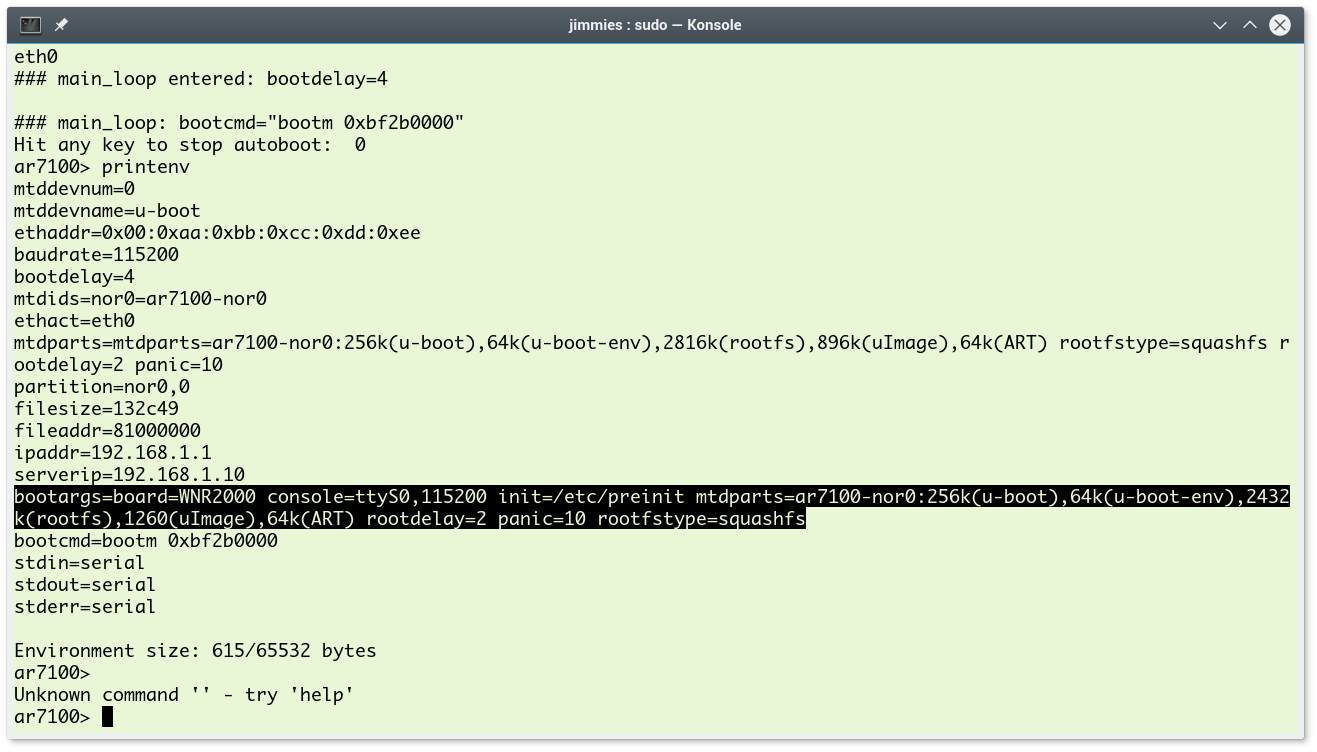
One nifty thing about the newer LEDE/OpenWRT releases is that we only have to tell it where to generally find rootfs and uImage (called the firmware region). We don't have to tell it the boundaries of those partitions. U-boot should look like this once you have set up everything correctly:
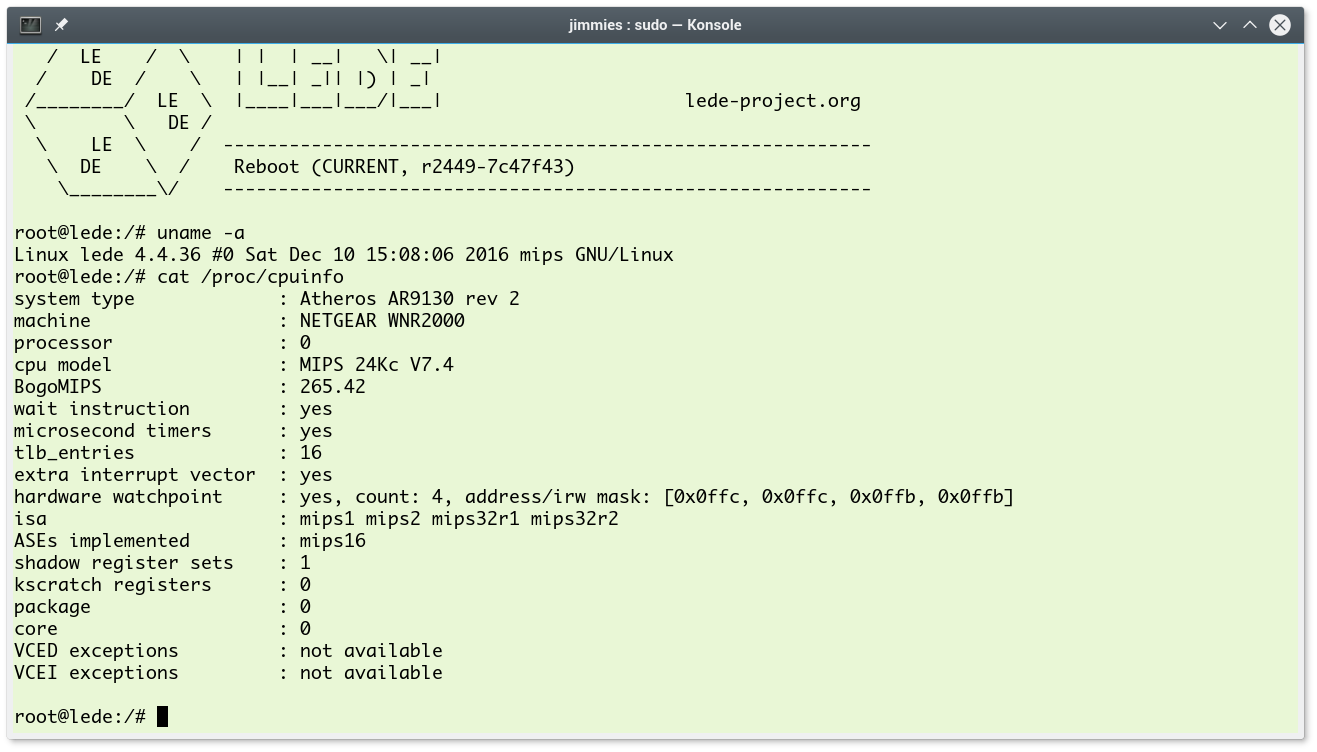
So after about 24 hours and lots of trial-and-errors, I was able to get LEDE to work wonderfully on my router. Here it comes:
I have also edited the wiki, so if you happen to have the same one laying somewhere and need detailed how-to style installation instructions, head to the OpenWRT wiki to read more.
Looking back, there wasn't anything super-tricky, but there were a lot of things that got in the way. I hope my pull request to LEDE will be accepted and we will all see official support of LEDE for the WNR2000v1 board soon. Edit 12/14/2016: Now the board support is mainlined. So while the whole process is still a little bit rough, but that was not too hard!
I hope this will help you understand the general concepts of how primitive AR71XX routers work better. Hopefully this will inspire you to go ahead contribute to the LEDE project by porting it to your router :). They have a relatively strict standard for code submission though, which is good to create good habits.
Specific notes for WNR2000:
- Don't try to upgrade from stock firmware with the factory image, this will make the router unable to boot. The LEDE factory image will flash over the stock control panel and will also flash over the emergency TFTP interface in u-boot, but it won't boot. I know why, but I don't know how to fix it. There is an integrity check, but I gave up after a day trying to create a factory image that would flash without errors – it took me too much time and it is sort of a diminishing return at this point.
- The reason that u-boot said that it see
bad magicis that it expects the raw squashfs image instead of the squashfs filesystem with a magic number, this is unlike every other model in the WNR2000 series. - The reason why we want to load the uImage at
0xbf2b0000instead of0xbf2a0000(default for many devices) is that only then we have enough erase blocks for therootfs_datapartition (firmware settings). If we burn uImage at0xbf2a0000, we won't be able to save any setting. - It is still now impossible to upgrade via sysupgrade image and every time we want to upgrade the router firmware, we will still have to do it manually via u-boot. You just don't have to compile the firmware.